Search Blog
Recent Posts
-
 Dlaczego warto założyć...
Ten wpis na blogu podkreśla, dlaczego warto rozważyć Prestashop dla biznesu B2B.
Apr 18, 2025 Czytaj więcej
Dlaczego warto założyć...
Ten wpis na blogu podkreśla, dlaczego warto rozważyć Prestashop dla biznesu B2B.
Apr 18, 2025 Czytaj więcej -
 5 modułów PrestaShop, które...
Ten wpis na blogu ma na celu poinformowanie Cię o 5 najlepszych modułach Prestashop, które właściciele sklepów muszą...
Apr 16, 2025 Czytaj więcej
5 modułów PrestaShop, które...
Ten wpis na blogu ma na celu poinformowanie Cię o 5 najlepszych modułach Prestashop, które właściciele sklepów muszą...
Apr 16, 2025 Czytaj więcej -
 5 porad na szybszy sklep...
W tym wpisie na blogu znajdziesz najważniejsze wskazówki, które pomogą Ci zwiększyć szybkość działania sklepu...
Apr 10, 2025 Czytaj więcej
5 porad na szybszy sklep...
W tym wpisie na blogu znajdziesz najważniejsze wskazówki, które pomogą Ci zwiększyć szybkość działania sklepu...
Apr 10, 2025 Czytaj więcej -
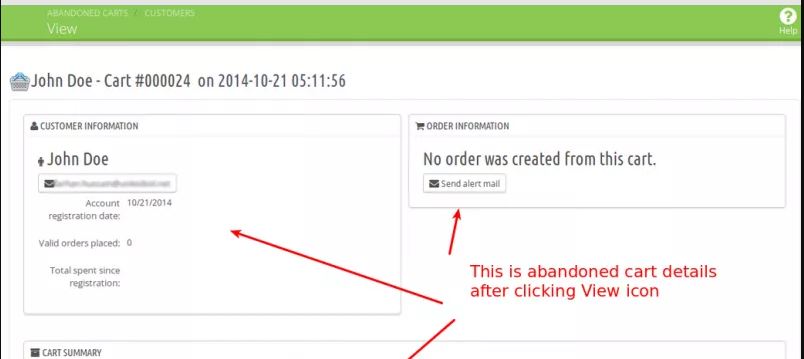 Odzyskaj sprzedaż dzięki...
W tym ciekawym wpisie na blogu wyjaśniono, w jaki sposób innowacyjny moduł przypomnień o porzuconych koszykach może...
Apr 8, 2025 Czytaj więcej
Odzyskaj sprzedaż dzięki...
W tym ciekawym wpisie na blogu wyjaśniono, w jaki sposób innowacyjny moduł przypomnień o porzuconych koszykach może...
Apr 8, 2025 Czytaj więcej -
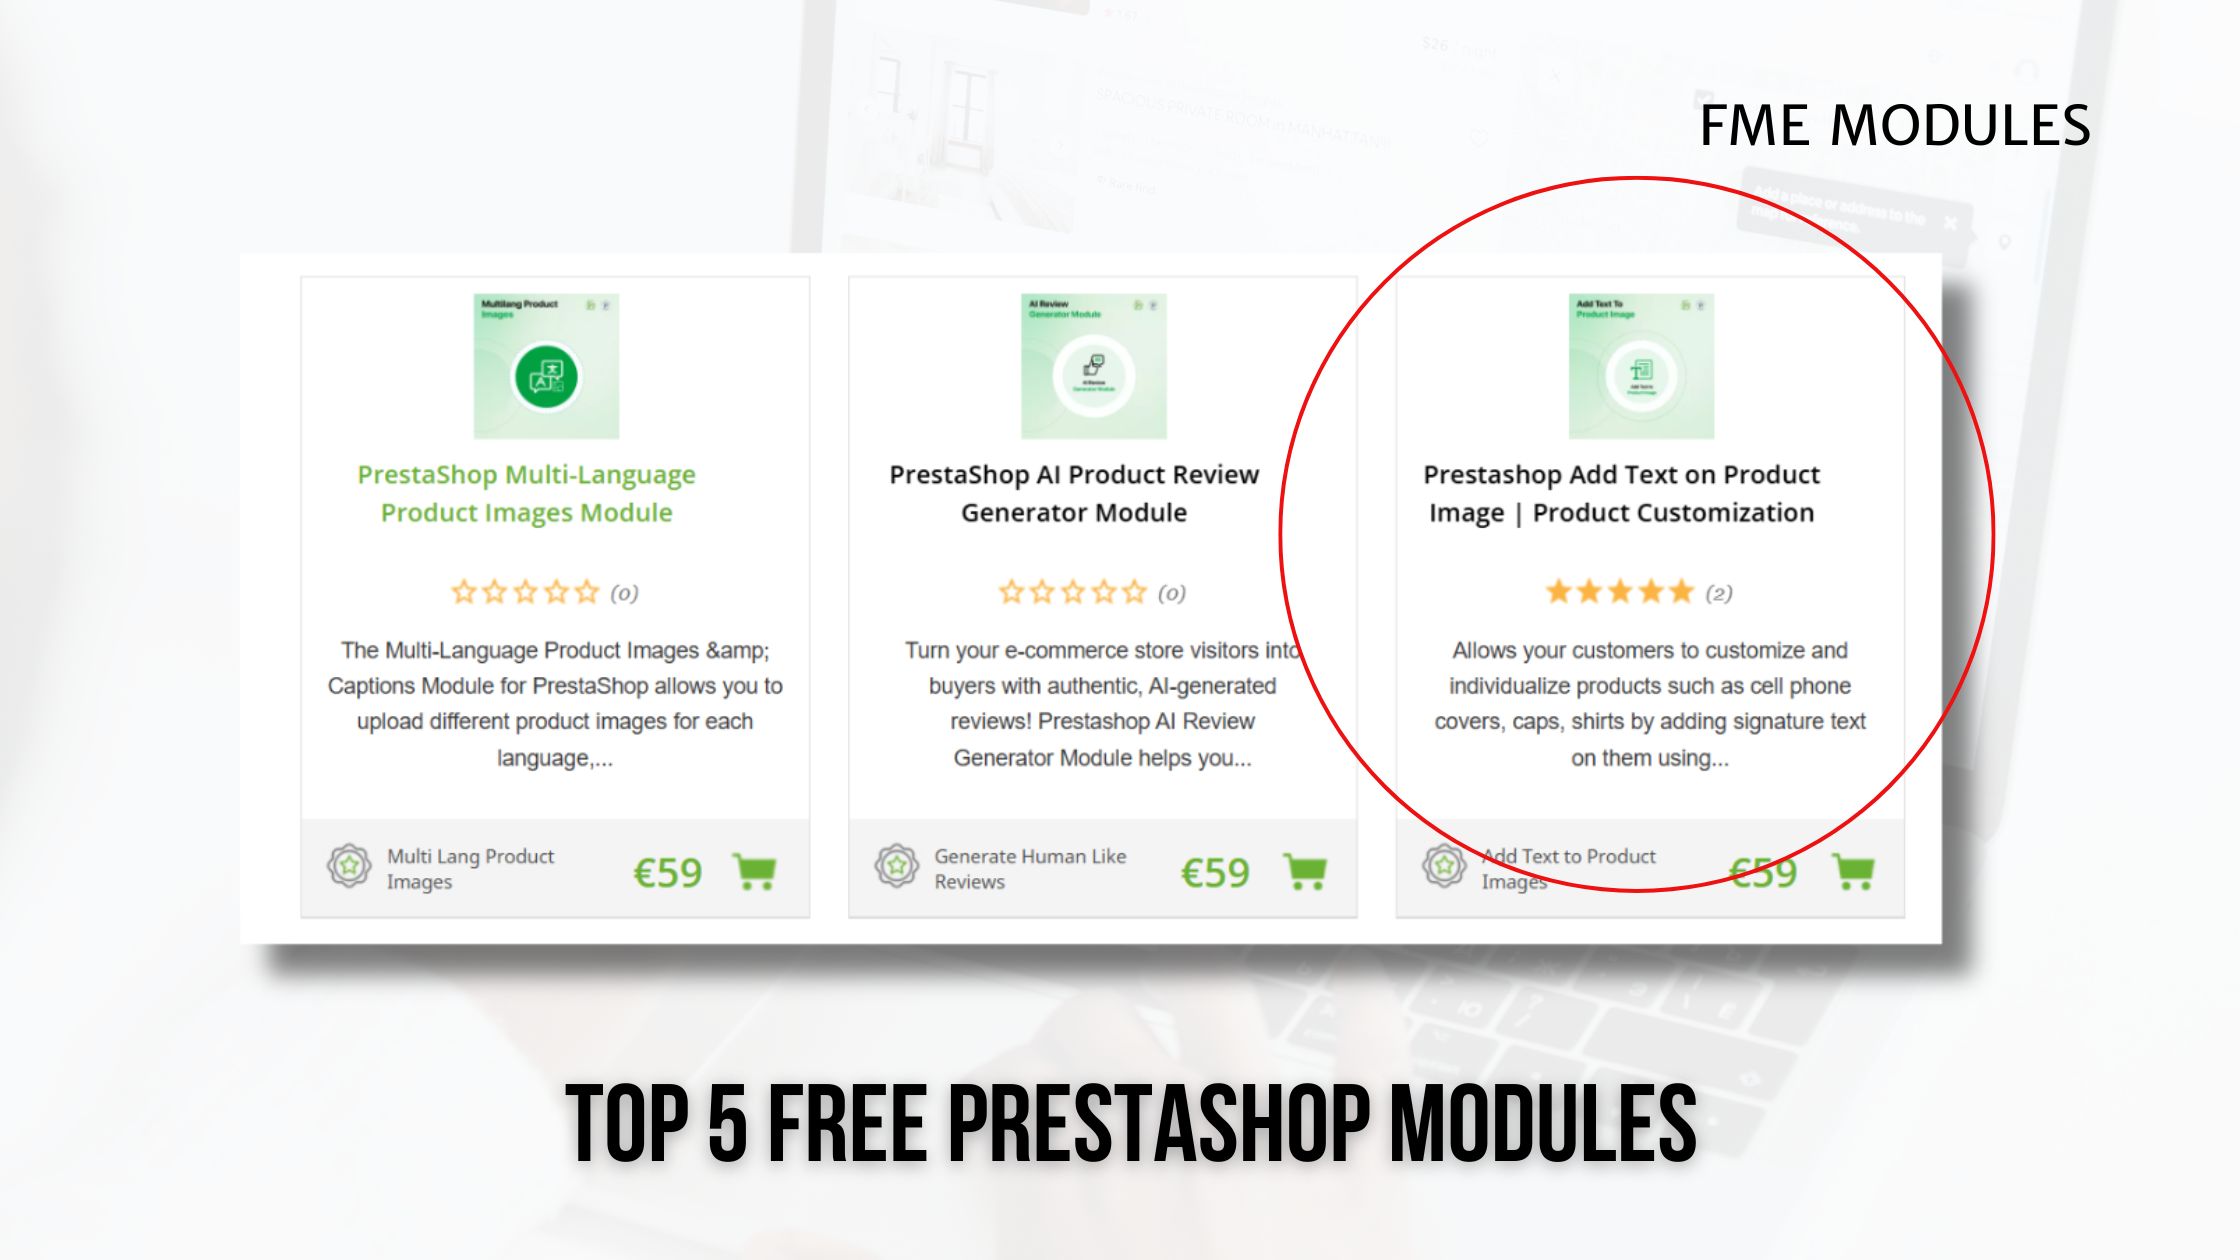 5 niezbędnych darmowych...
Ten wpis na blogu dotyczy 5 najlepszych darmowych modułów Prestashop, które e-commerce musi wypróbować 5 modułów.
Mar 28, 2025 Czytaj więcej
5 niezbędnych darmowych...
Ten wpis na blogu dotyczy 5 najlepszych darmowych modułów Prestashop, które e-commerce musi wypróbować 5 modułów.
Mar 28, 2025 Czytaj więcej

Jak bez wysiłku rozszerzyć formularze rejestracji klientów w Prestashop?

Posted On: May 8, 2023
Categories: Optymalizacja konwersji
Możesz stracić wysoki procent potencjalnych klientów, ponieważ Twój sklep internetowy nie potrafi się personalizować. Można winić domyślny formularz rejestracyjny sklepu Prestashop za to, że ma kilka pól do zebrania podstawowych informacji, które nie wystarczą do poprawy doświadczenia klienta lub zwiększenia sprzedaży.
Jak więc możesz to zrobić? Oczywiście poprzez rozszerzenie formularza rejestracyjnego, aby zaprosić więcej wpisów od potencjalnych klientów. Możesz następnie wykorzystać te informacje do reklamowania konkretnych ofert różnym grupom klientów i personalizowania ogólnego doświadczenia zakupowego, co jest skuteczną strategią zwiększania liczby konwersji.
W tym poście na blogu omówimy dwa sposoby rozszerzenia formularza rejestracyjnego w sklepie Prestashop. Jeden wykorzystuje metodę kodowania, do której potrzebny będzie programista, a drugi korzysta z modułu formularza rejestracyjnego FME Prestashop, który nie wymaga znajomości kodowania.
Kodowanie lub instalacja modułu rejestracji Prestashop?
Jeśli chcesz uniknąć kodowania w celu rozbudowy domyślnego formularza, najlepszym rozwiązaniem będzie zainstalowanie modułu rejestracji niestandardowej FME. Nawet jeśli zajmujesz się kodowaniem, ale nie chcesz tracić czasu na rozwiązywanie problemu związanego z rozszerzaniem formularza rejestracyjnego, skorzystanie z modułu jest najlepszym sposobem na zwiększenie zaangażowania i Sprzedaż Prestashopu.
Możesz także pobrać nasz moduł niestandardowych pól rejestracyjnych ze strony oficjalny Prestashop store.
Rozszerzanie pól rejestracyjnych Prestashop o kod
Step 1: Start modifying the ps_customer table by adding columns with the name of new_field and
new_field_mandatory. Edit classes/form/CustomerFormatter.php
Step 2: Navigate to phpMyAdmin and run this SQL command:
ALTER TABLE ps_customer ADD COLUMN new_field VARCHAR(250);
ALTER TABLE ps_customer ADD COLUMN new_field_mandatory VARCHAR(250);
Step 3: Move to CustomerFormatter class to edit as it leads to display the fields on the PrestaShop registration form.
Search: $format['email']
Add before:
$format['new_field'] = (new FormField)
->setName('new_field')
->setLabel(
$this->translator->trans(
'New field', [], 'Shop.Forms.Labels'
)
)
;
$format['new_field_mandatory'] = (new FormField)
->setName('new_field_mandatory')
->setLabel(
$this->translator->trans(
'New Field Mandatory', [], 'Shop.Forms.Labels'
)
)
->setRequired(true)
;
Here, you get the ease of changing the placement of new fields where suitable.
Step 4: Modify classes/Customer.php
Create new columns to expand the customer model. Configure validation and mark the field mandatory as well.
Search for:
public $groupBox;
Add after:
public $new_field;
public $new_field_mandatory;
Search:
'table' => 'customer',
'primary' => 'id_customer',
'fields' => array(
Add after:
'new_field' => array('type' => self::TYPE_STRING),
'new_field_mandatory' => array('type' => self::TYPE_STRING, 'required' => true),
Step 5: Save the Changes to review them on the PrestaShop customer registration form. Find if the newly created fields appear with the names New Field and New Field Mandatory.
These changes will also reflect in the information section of the customer accounts already created in the store. They can provide information now.
Step 6: Log in to the back office of your PrestaShop store. Click Customer Settings.
Edit Admin Customers Controller with the new fields.
Search:
array(
'type' => 'text',
'prefix' => '',
'label' => $this->trans('Email address', array(), 'Admin.Global'),
'name' => 'email',
'col' => '4',
'required' => true,
'autocomplete' => false
),
Add after:
array(
'type' => 'text',
'label' => $this->trans('New field', array(), 'Admin.Global'),
'name' => 'new_field',
'col' => '4',
),
array(
'type' => 'text',
'label' => $this->trans('New field mandatory', array(), 'Admin.Global'),
'name' => 'new_field_mandatory',
'required' => true,
'col' => '4',
),
Go to the PrestaShop customer registration form and the fields may appear.
Step 7: Edit the Customers Page using
adminXXX/themes/default/template/controllers/customers/helpers/view/view.pl
Search:
{l s='Age'}
{if isset($customer->birthday) && $customer->birthday != '0000-00-00'} {l s='%1$d years old (birth date:
%2$s)' sprintf=[$customer_stats['age'], $customer_birthday]} {else} {l s='Unknown'} {/if}
Add after:
{l s='New field'}
{if isset($customer->New_field)} {$customer->New_field} {else} {l s='Unknown'} {/if}
{l s='New field mandatory'}
{if isset($customer->New_field_mandatory)} {$customer->new_field_mandatory} {else} {l s='Unknown'}
{/if}
Save and the fields will display.
Step 8: Expand Fields to the Customer table in the back office.
To make the newly created fields appear in the customer table, you need to edit Admin Customers Controlled with the fields. Modify controllers/admin/AdminCustomersController.php
Search:
'email' => array(
'title' => $this->trans('Email address', array(), 'Admin.Global')
),
Add after:
'new_field' => array(
'title' => $this->trans('New field', array(), 'Admin.Global')
),
'new_field_mandatory' => array(
'title' => $this->trans('New field mandatory', array(), 'Admin.Global')
),
Search:
) as connect
Add after:
,new_field, new_field_mandatory
Save the file and review the new columns.
Step 9: Move changes to override. Copy files. Replace in Destination files. Purge Cache.
This way, you will be able to expand the registration form in PrestaShop 1.7. It is cost-effective but complex and vulnerable to bugs too. Installing a plugin or module seems to be a more hassle-free technique. Learn it in the following tutorial.
Rozbudowa o moduł rejestracji klientów
The PrestaShop registration form is a purpose-built module that allows you to expand the sign-up form with additional fields and options with a few clicks. It helps you acquire relevant and accurate information about potential customers the moment they register for an account. you can add as many fields as you want to know their interests.
The module supports several field types to help you create easy-to-answer options. These include dropdown, multi-select, radio button, Yes/No option, date, text area, and message only. Using dependable fields, you can hide additional options as they appear when a condition in its preceding field is fulfilled.
Besides these core features, there are plenty of other useful options to expand the registration form without writing a single line of code. Follow the steps to install the app and start customizing customer registrations in PrestaShop.
Step 1: Download and install the module, and you will get a new section in the dashboard named Registration Fields.
Step 2: Click Manage Registration Fields to create new options and manage them from a central dashboard.
Step 3: Click the + sign labeled as ‘Add New Field.’
Step 4: Write a field name
Step 5: Specify field size (applicable to text and text area fields only)
Step 6: Add a field to a block of options
Step 7: Select field type.
The PrestaShop customer registration module helps you select an option type that relates to the question or query. Ask for a detailed answer in the text area or a short one in the text field. Try these field types:
- Text field
- Text area
- Date
- Yes/No
- Multi-selec
- Dropdown
- Checkboxes
- Radio button
- Image
- Attachment
- Message (Display Only)
Step 8: Implement field validation to ensure accuracy in data collection through registration forms. You can validate fields by:
- Decimals
- Integers
- Email address
- Web URL address
- Letters only
- Letters and/or numbers
- Date
Step 9: Mark the field mandatory and customers won't be able to register without answering the option. It is useful in collecting important information about customers.
Step 10: Create dependent fields.
Make one field dependent on another. For example, you can make a kid's field dependent on the marital status field. If the customer selects married, the kid's field will appear, otherwise, it won't.
Click Save and you have successfully created a field. Repeat this simple process to add more fields.
Note: If you want to customize your product page by adding custom fields only to your product's page, you can use the Prestashop custom product fields module. This module works specifically on your Product's detail page.
Zabierać
Formularz rejestracyjny PrestaShop wymaga udoskonalenia i dodatkowych funkcji istotnych dla prowadzonej działalności. Porównując powyższe sposoby rozbudowy formularza rejestracyjnego, można stwierdzić, że korzystanie z modułu jest najłatwiejsze. Oprócz innych przydatnych funkcji oferuje dodanie różnych typów pól.
Najczęściej zadawane pytania (FAQs)
Jakie są korzyści z używania modułu Custom Registration Fields w Prestashop?
Moduł Prestashop Registration Form pozwala na uzyskanie dodatkowych informacji od klientów. Dzięki temu możesz lepiej zrozumieć ich zachowanie i potrzeby, aby oferować im bardziej dopasowane i spersonalizowane rozwiązania.
Czy moduł Prestashop Registration Form pomoże mi zwiększyć sprzedaż?
Tak, dostosowując sklep e-commerce do preferencji klientów i oferując im odpowiednie promocje, z pewnością zauważysz wzrost konwersji.
Jakie są najważniejsze typy pól niestandardowych?
Oto kilka kluczowych pól niestandardowych, które możesz dodać:
- Pola wyboru (Checkboxes)
- Wybór daty (Date picker)
- Data urodzenia (Birthdate)
- Ulubiona kategoria (Favorite category)
- Wybór daty i godziny (Date time picker)
- Etykiety (Labels)
- Pole liczbowe (Number field)
Products Related To This Post
-
 Prestashop Wybierz grupę...
Prestashop Select Customer Group at Registration...
-
 Prestashop Zatwierdź nowych...
Prestashop Validate New Users at Registration...
-
 Moduł rejestracji...
Uprość proces rejestracji dzięki Modułowi...
-
 PrestaShop Niestandardowe...
Moduł rejestracji PrestaShop przekształca proces...