Set Up Google Maps for PrestaShop Store Locator Guide
Posted On: Jul 30, 2024
Categories: Shopping Carts and E-Commerce Platforms: A Complete Guide
Guide on How to Set Up Google Maps for PrestaShop Store
Explore the importance of having the online appearance of your physical stores. Get to know how you can enhance the customer experience along with the SEO optimization and increased traffic to your physical stores, with advanced features.
In the modern era where everything has its online appearance over the internet, especially the e-commerce businesses where the main thing is to be visible everywhere globally. This is important because people consider online shopping now rather than to shop from physical stores. Therefore, having a virtual appearance of your e-commerce business is crucial to gain more sales.
The Store location feature is vital for the retails and those who deals with the multiple location network. These store locators on multiple locations of your webpage, guides the users in many ways, for example user looking for a handbag can search the nearest store with the stock availability of that handbag and can easily navigate easily via Google Maps to the physical store if wants to check the variety of product.
This way merchants of online stores can increase the interest of users to buy products from online stores and if required, can go for offline shopping but in their nearest stores.
A vigorous store locator offers multiple functionalities apart from the simple display of a store on Google Map. Users can easily finds the important details regarding the store and sometime the store owners as well, like store addresses, working hours, navigation system, and much more. Having such a smooth shopping experience will bring users to both your online and physical stores.
In addition local SEO will get a boost with the help of store locators that ultimately brings more organic traffic to your stores. Not only the SEO but also you can make use of customers information which you can get from them, to understand the customer’s buying behavior.
Now as companies are focused on their online appearance worldwide, they are also keen to improve their offline presence. For this, companies are majorly working with a combination of both the online and offline business modes. Creating a store locator from scratch requires much time and the experienced resources as well.
In contrary, there are built in tools and addons that you can buy from different digital platforms, and integrate to your stores in a few clicks. Consider for example, you are running a PrestaShop store and want to add store locator in it, although there is a variety of multiple modules, that might be free (with a few functionalities) or paid with a fully functional process.
We at FMM are offering a similar kind of module named PrestaShop Google Maps & store locator module, in a very reasonable price range and a multiple of features. This could be an easy tool for your website that could be installed a few clicks with a plus point of no code writing.
Let us go deep into the store locator optimization that will exceed the customer expectations and driving more visitors to your locations.
Benefits of Embedding Google Maps to a Website
Integrating Google maps to a website is as important as doing its SEO. This enables users to find your store locations and a seamless navigation to stores. There are a lot of benefits of using Google Maps on a website and some of them are listed below:
- It helps people find your business
- People get your contact information that might be missing elsewhere on your site
- Allows people to reach your physical location
- Engages users on your website
- Gives a better user experience to customers
Ways to embed Google Maps into your website
Although there are certain ways you can embed Google maps to your website, but a few most common ways are listed below:
Embedding Google Maps Through Codes
Google Maps can be embedded into a website using writing codes. This goes for experienced professionals who have a detailed knowledge of the codes. Moreover, if you are not familiar with coding you need some services from a professional company or any professional individual.
1. Use Iframe Code: The easiest way to embed a map on your website is to use iframe code. The Google Maps software provides iframe tags if you choose to embed the map with a specific location.
2. Embed Responsive Google Maps Without API: If your website is HTML-based, you can embed Google Maps without the need of an API key. All you need to do is, use CSS with your HTML code and create a responsive map for your website.
3. Embed using JavaScript (API): This is the most complicated way to add a Google map to your website because it requires deep knowledge of HTML, CSS, and JavaScript as well. To reduce the hassle of coding, people who do not know how to code should use the other methods mentioned in this article.
You have to visit Google Cloud Platform, Generate an API key, and integrate CSS into it. Doing this you will get a script that will be run on your site and you will get a fully responsive Google map on your website.
Embedding Google Maps through Third-Party Applications
For non-technical people, it is better to use the methods mentioned below:
Use Store locator plugins: If you own a business with multiple physical locations, one of the easiest ways to add a Google map to your website is to use a store location plugin. The Store Locator plugin allows you to embed a Google map on your website without having to deal with complex codes.
Additionally, many store locator plugins, such as Google Maps PrestaShop, specifically allow the PrestaShop store owners to add Google Maps without coding.
Apart from PrestaShop, WordPress also offers a number of plugins, that offer the same functionalities of Store locators integration.
To escape from writing code, my honest opinion is that you should go for plugin options, and for PrestaShop, I would recommend the very popular module named PrestaShop Store Locator by FMM. You can get it from the FMM official site and also from the Prestashop marketplace.
Below is a detailed discussion regarding this store locator module, from installation to its successful integration into your PrestaShop Store.
Introduction to Google Maps PrestaShop
After the successful purchase of the module, you have to keep a thing in mind that is a proper backup of your store. It's a safe practice to make a backup of your files and database before installing any module on PrestaShop.
Instructions for Installation:
- Firstly log into PrestaShop admin panel, from there go to Modules and Click on Add new module
- Select the file storelocator.zip which you’ve downloaded and click upload this module
- Scroll down to find Store Locator and click Install
- Clear Cache in the Performance, you will reach here from Advance Parameters
- Store locator Module will override the stores menu under Shop Parameters -> Contact
Configuration for Adding Multiple Stores
After installing the module, the first thing to start is adding your stores no matter how many stores you have. Navigate to Stores from the Store Locator block in the left menu.
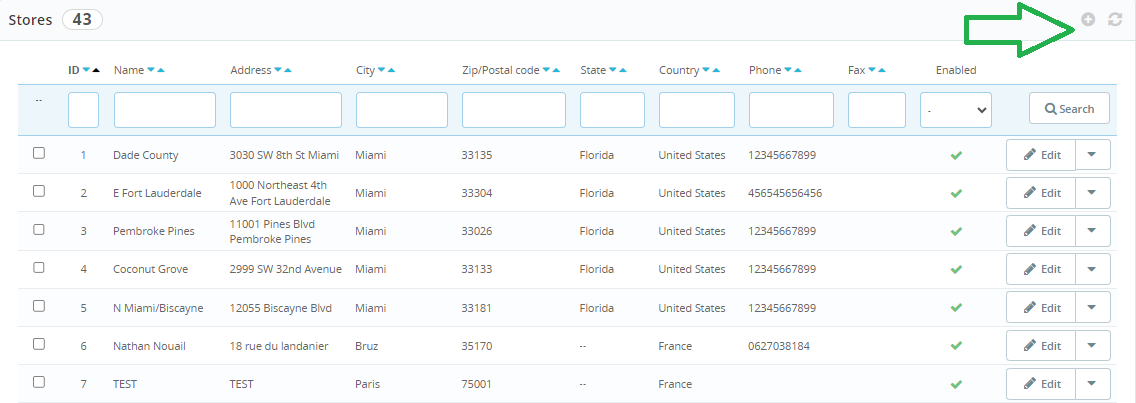
- Adding store locations is a simple process, the admin just has to add the required information in the respective fields, including name, address, country, city, Lat/Long values, and Email address.
- Apart from that, admin can attach images of their stores to display at their stores.
- Admin can add the store map icon for stores.
- Another important feature is the display of products in the related stores. Admin can associate the related products to the particular store dealing with that item.
- Working hours can be added for users to know the business hours.
General Configuration for Store Locator module
Using the google maps PrestaShop module, admin can customize the settings including Map theme, product page titles, units for Distance, and many other features.
Simply navigate to the Settings option under Store Locator heading (in the left menu). It will brings you to the configuration page, from where you can customize the store and map display settings as per requirements.
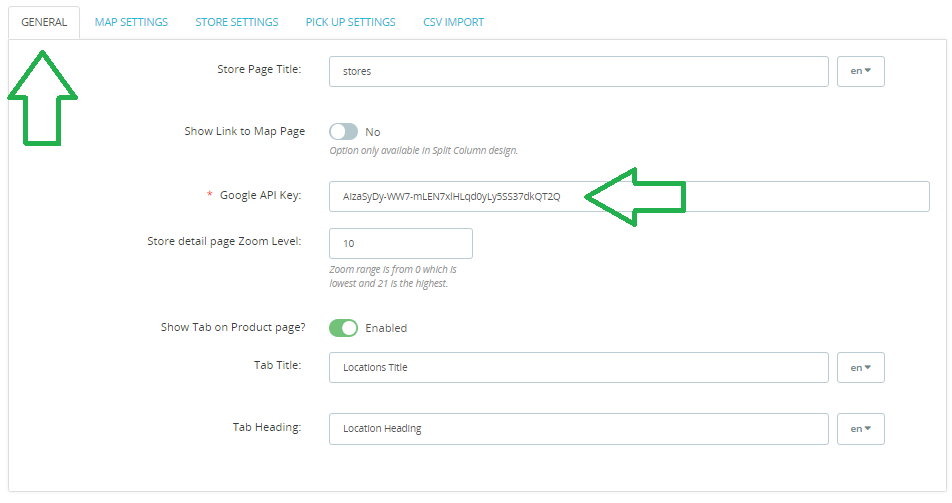
General Settings
This section allows the admin to configure the basic settings for the stores and maps.
- Admin can add title for Store page, set the zoom level, displaying tab on product page option.
- Apart from them, main setting is the integration of Google API Key. This is something user will have to get from here: https://developers.google.com/maps/documentation/javascript/get-api-key
Map Settings
From this part, admin would be able to design the layout of Google Map on the frontend. Multiple customization features have been here to work with.
- Maps page layout option added for admin having two options: Classic or Split Column
- Admin can set the default zoom level.
- Distance unites can be set in Miles or Kilometers.
- Map themes can be set for main store page, homepage.
- Maps can be displayed in either left or right columns or both.
- Admin can enable autolocate option for users to find the nearest store.
- Option added which if enabled, allows users to find stores with respect to the products they are looking for.
Store Settings
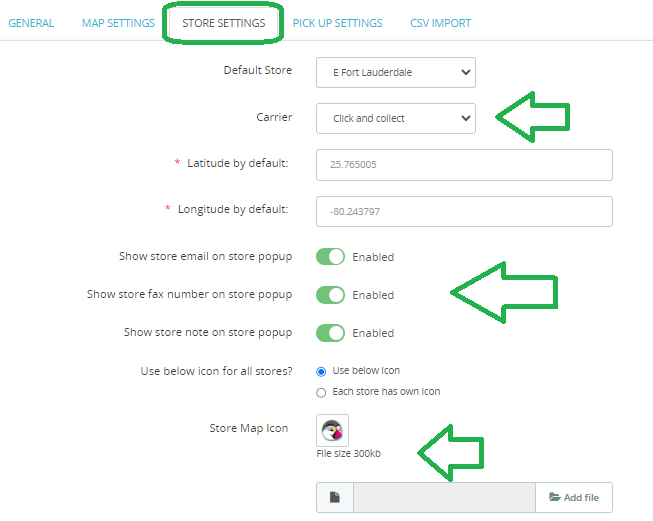
Admin can set the store settings from the Store Settings option.
- The default store and the lat/long features can be chosen by the admin.
- A store popup can be displayed when a user lands on your store, this popup can also be customized with the email, fax number, and store note by the admin.
- Admin can customize the icon for stores. Either the same icon can be used for all stores or multiple stores can have their icons.
Pickup Settings
A recent update in the store locators is the addition of in-store pickup functionality. Although online shopping is much more convenient for users when it comes to satisfaction, they do not rely on online stores especially when we talk about clothes, shoes, or any product which needs to be checked before the final purchase.
To reduce the hassle of returning issues, e-commerce stores have introduced store pickup options for users. Users can order online for the product and can find the nearest store that has the desired product in store.
Users can have both options of payment, either they can pay for products online and pick up their products in stores or can pay for the products in the stores.
- Admin can enable the pickup in stores setting for PrestaShop stores.
- Admin can give users with option of selecting pick-up date and time.
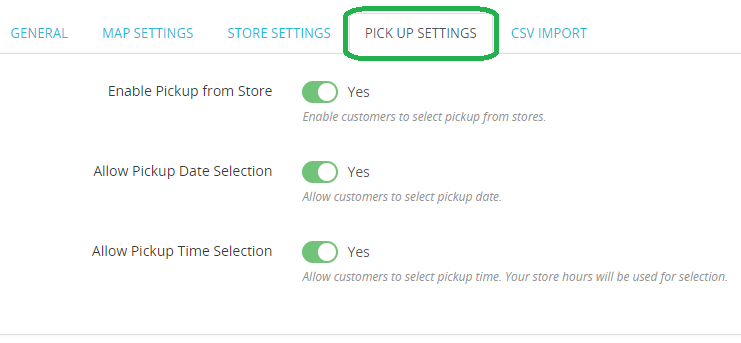
CSV Import
If the store owners have multiple stores, then this option would be useful for them. To reduce the hassle of uploading information about each store manually, they just have to upload a CSV file and all their information will be imported into the dashboard.

Generate PDF Delivery Slips
Admin has the option to generate the delivery slips of the orders from the selected stores. The slips can be filtered by setting the date range.

Store Order Details at Back-Office
Admin can view the orders placed by customers from different stores. All orders can be seen at a same location.

Conclusion
In-store experiences are just as important as digital ones. A store locator app blends the both. It not only increases the in-store visits but also the visibility of your online store. This store location option helps you create effortless store management, so just start mapping your stores online for giving a better user interface and a seamless customer interaction.
You can get all this using the google maps prestashop module. After understanding this comprehensive guide you would be able to implement store locators to your PrestaShop stores and can take the advantage of increased visibility and traffic to your site.
Frequently Asked Question
What is a store locator?
A Store Locator is a functionality integrated into a website, allowing users to easily and quickly find the location of your store using Google Maps.
Is PrestaShop store locator mobile responsive?
Yes, our module is highly responsive with mobiles.
How many store locations I can upload on my website?
You can add multiple store locations to your prestashop stores. You can import stores from CSV files or can add manually from the backend.
Is the Google Maps API free?
Google Maps API is free but upto a certain limit. You won't be charged until your usage exceeds $200 in a month. Note that the Maps Embed API, Maps SDK for Android, and Maps SDK for iOS currently have no usage limits and are at no charge (usage of the API or SDKs is not applied against your $200 monthly credit).
Why do people buy online pick up in store?
When it comes to the choice and accessibility, users do not rely on just online shopping, infact they want to check the order products by themselves especially if the store exists nearby. That is something you can say buy online and pick up in store.


