Search Blog
Recent Posts
-
 Por que você deve...
Apr 18, 2025 Exibir
Por que você deve...
Apr 18, 2025 Exibir -
 5 Módulos PrestaShop para...
Este post do blog tem como objetivo apresentar os 5 melhores módulos PrestaShop que os lojistas devem instalar para...
Apr 16, 2025 Exibir
5 Módulos PrestaShop para...
Este post do blog tem como objetivo apresentar os 5 melhores módulos PrestaShop que os lojistas devem instalar para...
Apr 16, 2025 Exibir -
 5 dicas para acelerar seu...
Este post do blog traz dicas importantes que podem ajudar a aumentar a velocidade da sua loja PrestaShop.
Apr 10, 2025 Exibir
5 dicas para acelerar seu...
Este post do blog traz dicas importantes que podem ajudar a aumentar a velocidade da sua loja PrestaShop.
Apr 10, 2025 Exibir -
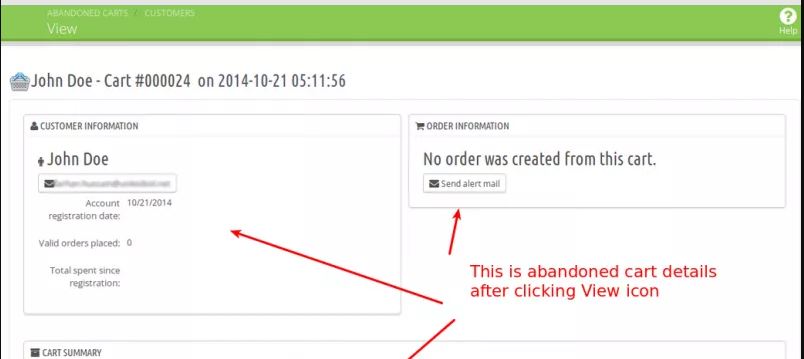 Recupere vendas com...
Este interessante post de blog mostra como o inovador Módulo de Lembrete de Carrinho Abandonado pode ajudar você a...
Apr 8, 2025 Exibir
Recupere vendas com...
Este interessante post de blog mostra como o inovador Módulo de Lembrete de Carrinho Abandonado pode ajudar você a...
Apr 8, 2025 Exibir -
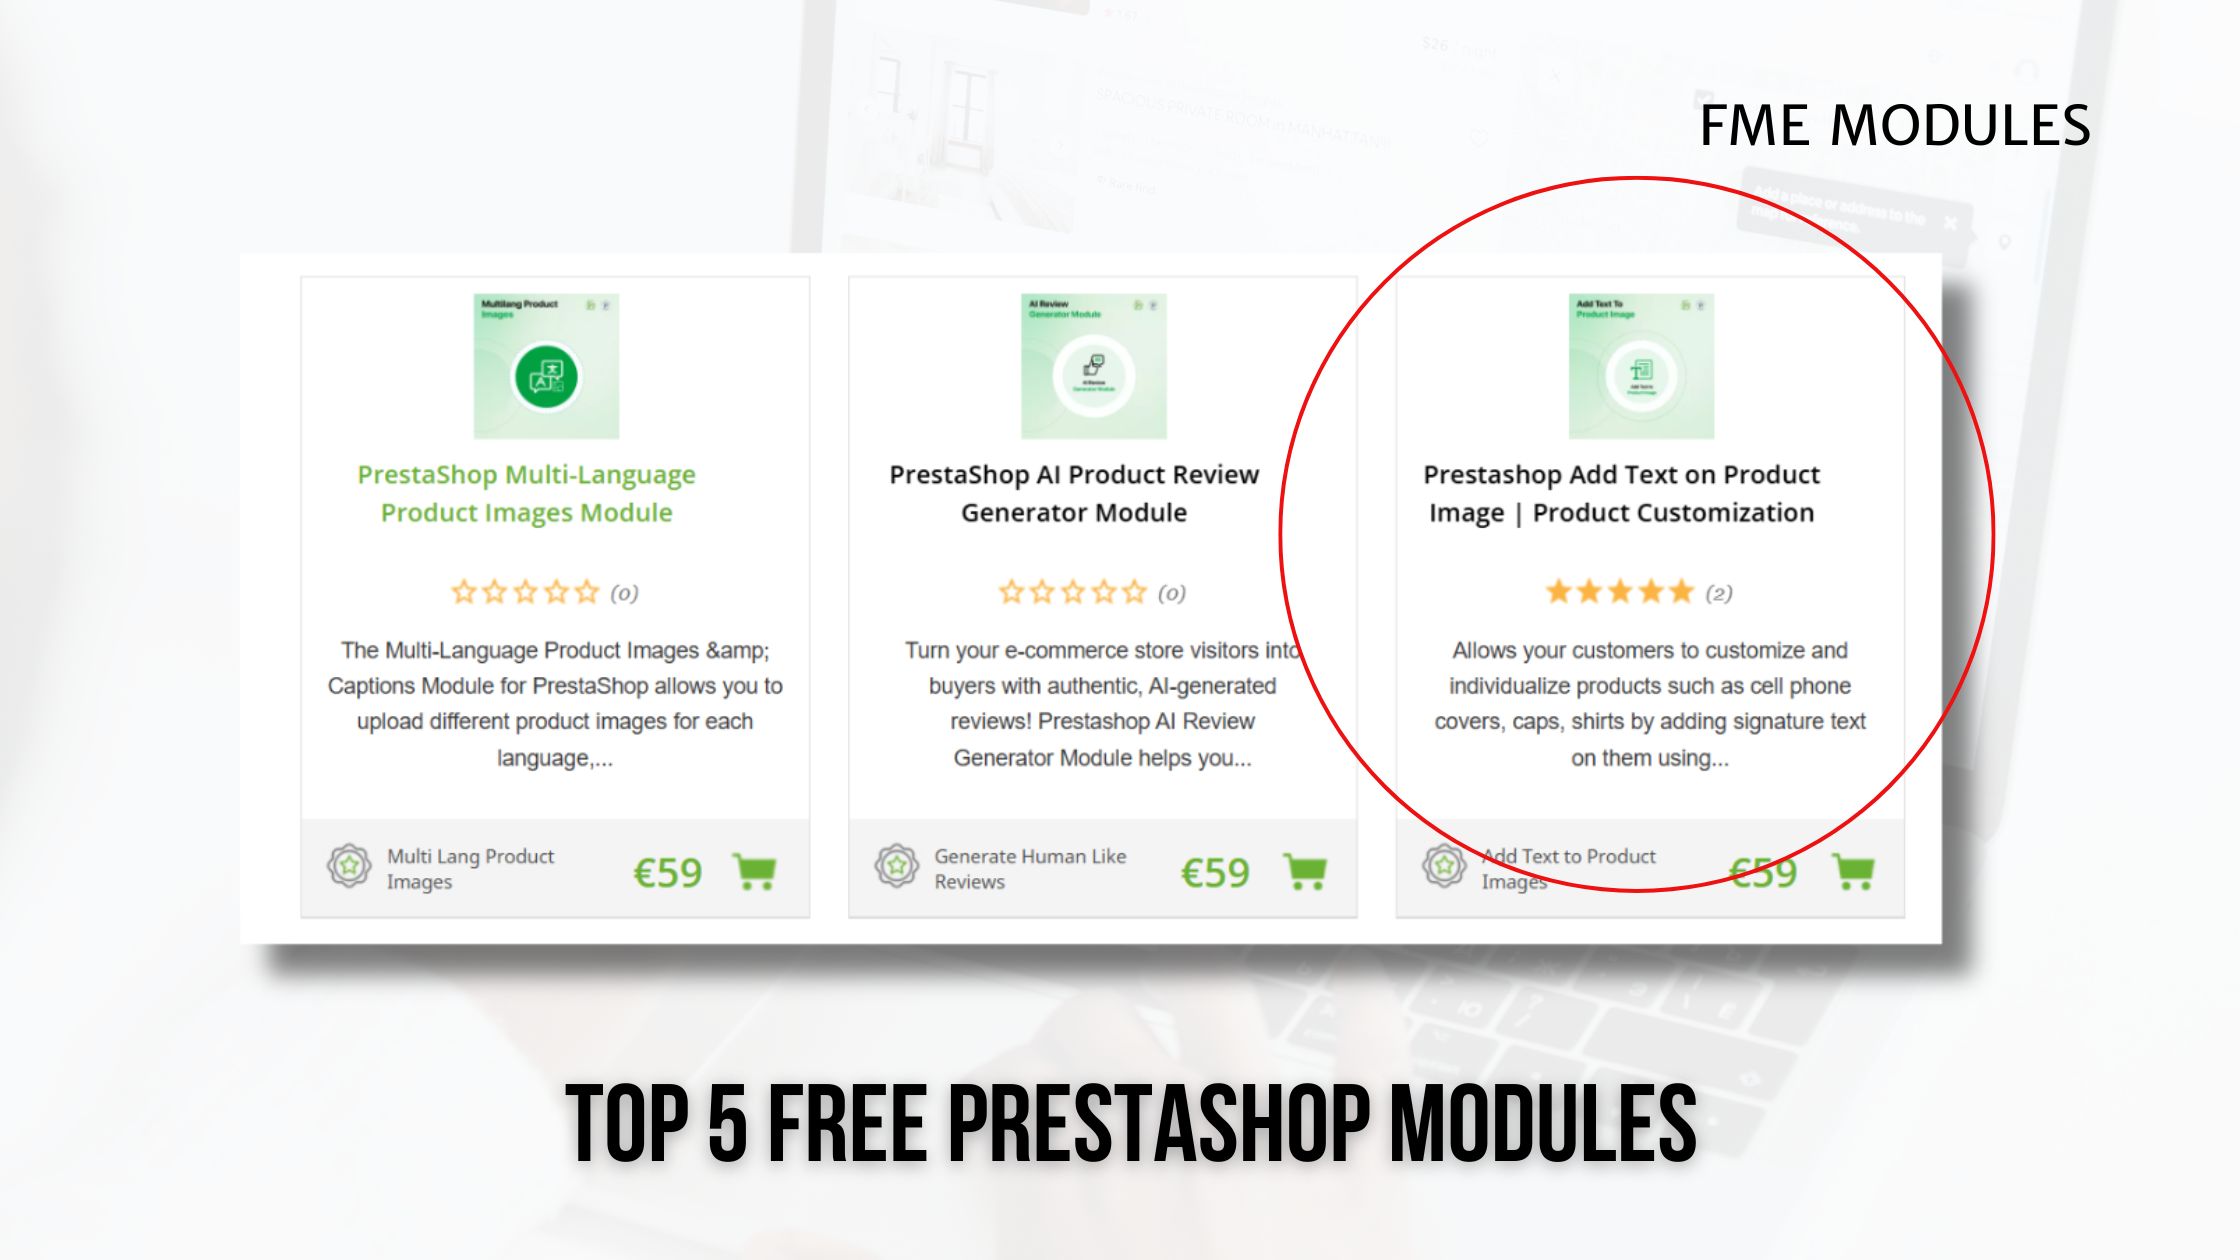 5 Módulos Prestashop...
Este post do blog é sobre os 5 melhores módulos gratuitos do Prestashop que um e-commerce deve experimentar.
Mar 28, 2025 Exibir
5 Módulos Prestashop...
Este post do blog é sobre os 5 melhores módulos gratuitos do Prestashop que um e-commerce deve experimentar.
Mar 28, 2025 Exibir

Como expandir sem esforço os formulários de registo de clientes na Prestashop

Posted On: May 8, 2023
Categories: Otimização de conversão
Pode perder uma elevada percentagem de potenciais clientes porque a sua loja de comércio eletrónico falha na personalização. Pode culpar o formulário de registo predefinido de uma loja Prestashop por isso, que tem alguns campos para recolher as informações básicas que não são suficientes para melhorar a experiência do cliente ou aumentar as vendas.
Então, como é que se pode fazer isso? Claro que sim, expandindo o formulário de registo para convidar mais entradas dos potenciais clientes. Pode então utilizar essa informação para publicitar ofertas específicas a diferentes grupos de clientes e personalizar a experiência geral de compra, o que constitui uma estratégia eficaz para aumentar as conversões.
Nesta publicação do blogue, discutiremos duas formas de expandir o formulário de registo da sua loja Prestashop. Uma é usar o método de codificação para o qual precisará de um programador e a outra é usar o Módulo de Formulário de Registo FME Prestashop que não requer conhecimentos de codificação.
Codificar ou instalar o módulo de registo Prestashop?
Se quiser evitar a codificação para a expansão do formulário predefinido, a instalação do FME Custom Registration Module é a melhor solução. Mesmo que goste de codificar, mas não queira perder tempo a resolver o problema da expansão do formulário de registo, a utilização do módulo é a melhor forma de aumentar o envolvimento e a Vendas Prestashop.
Também pode obter o nosso módulo de campos de registo personalizados a partir do Prestashop oficial loja.
Expandir os campos de registo Prestashop com código
Step 1: Start modifying the ps_customer table by adding columns with the name of new_field and
new_field_mandatory. Edit classes/form/CustomerFormatter.php
Step 2: Navigate to phpMyAdmin and run this SQL command:
ALTER TABLE ps_customer ADD COLUMN new_field VARCHAR(250);
ALTER TABLE ps_customer ADD COLUMN new_field_mandatory VARCHAR(250);
Step 3: Move to CustomerFormatter class to edit as it leads to display the fields on the PrestaShop registration form.
Search: $format['email']
Add before:
$format['new_field'] = (new FormField)
->setName('new_field')
->setLabel(
$this->translator->trans(
'New field', [], 'Shop.Forms.Labels'
)
)
;
$format['new_field_mandatory'] = (new FormField)
->setName('new_field_mandatory')
->setLabel(
$this->translator->trans(
'New Field Mandatory', [], 'Shop.Forms.Labels'
)
)
->setRequired(true)
;
Here, you get the ease of changing the placement of new fields where suitable.
Step 4: Modify classes/Customer.php
Create new columns to expand the customer model. Configure validation and mark the field mandatory as well.
Search for:
public $groupBox;
Add after:
public $new_field;
public $new_field_mandatory;
Search:
'table' => 'customer',
'primary' => 'id_customer',
'fields' => array(
Add after:
'new_field' => array('type' => self::TYPE_STRING),
'new_field_mandatory' => array('type' => self::TYPE_STRING, 'required' => true),
Step 5: Save the Changes to review them on the PrestaShop customer registration form. Find if the newly created fields appear with the names New Field and New Field Mandatory.
These changes will also reflect in the information section of the customer accounts already created in the store. They can provide information now.
Step 6: Log in to the back office of your PrestaShop store. Click Customer Settings.
Edit Admin Customers Controller with the new fields.
Search:
array(
'type' => 'text',
'prefix' => '',
'label' => $this->trans('Email address', array(), 'Admin.Global'),
'name' => 'email',
'col' => '4',
'required' => true,
'autocomplete' => false
),
Add after:
array(
'type' => 'text',
'label' => $this->trans('New field', array(), 'Admin.Global'),
'name' => 'new_field',
'col' => '4',
),
array(
'type' => 'text',
'label' => $this->trans('New field mandatory', array(), 'Admin.Global'),
'name' => 'new_field_mandatory',
'required' => true,
'col' => '4',
),
Go to the PrestaShop customer registration form and the fields may appear.
Step 7: Edit the Customers Page using
adminXXX/themes/default/template/controllers/customers/helpers/view/view.pl
Search:
{l s='Age'}
{if isset($customer->birthday) && $customer->birthday != '0000-00-00'} {l s='%1$d years old (birth date:
%2$s)' sprintf=[$customer_stats['age'], $customer_birthday]} {else} {l s='Unknown'} {/if}
Add after:
{l s='New field'}
{if isset($customer->New_field)} {$customer->New_field} {else} {l s='Unknown'} {/if}
{l s='New field mandatory'}
{if isset($customer->New_field_mandatory)} {$customer->new_field_mandatory} {else} {l s='Unknown'}
{/if}
Save and the fields will display.
Step 8: Expand Fields to the Customer table in the back office.
To make the newly created fields appear in the customer table, you need to edit Admin Customers Controlled with the fields. Modify controllers/admin/AdminCustomersController.php
Search:
'email' => array(
'title' => $this->trans('Email address', array(), 'Admin.Global')
),
Add after:
'new_field' => array(
'title' => $this->trans('New field', array(), 'Admin.Global')
),
'new_field_mandatory' => array(
'title' => $this->trans('New field mandatory', array(), 'Admin.Global')
),
Search:
) as connect
Add after:
,new_field, new_field_mandatory
Save the file and review the new columns.
Step 9: Move changes to override. Copy files. Replace in Destination files. Purge Cache.
This way, you will be able to expand the registration form in PrestaShop 1.7. It is cost-effective but complex and vulnerable to bugs too. Installing a plugin or module seems to be a more hassle-free technique. Learn it in the following tutorial.
Expansão com um módulo de registo de clientes
The PrestaShop registration form is a purpose-built module that allows you to expand the sign-up form with additional fields and options with a few clicks. It helps you acquire relevant and accurate information about potential customers the moment they register for an account. you can add as many fields as you want to know their interests.
The module supports several field types to help you create easy-to-answer options. These include dropdown, multi-select, radio button, Yes/No option, date, text area, and message only. Using dependable fields, you can hide additional options as they appear when a condition in its preceding field is fulfilled.
Besides these core features, there are plenty of other useful options to expand the registration form without writing a single line of code. Follow the steps to install the app and start customizing customer registrations in PrestaShop.
Step 1: Download and install the module, and you will get a new section in the dashboard named Registration Fields.
Step 2: Click Manage Registration Fields to create new options and manage them from a central dashboard.
Step 3: Click the + sign labeled as ‘Add New Field.’
Step 4: Write a field name
Step 5: Specify field size (applicable to text and text area fields only)
Step 6: Add a field to a block of options
Step 7: Select field type.
The PrestaShop customer registration module helps you select an option type that relates to the question or query. Ask for a detailed answer in the text area or a short one in the text field. Try these field types:
- Text field
- Text area
- Date
- Yes/No
- Multi-selec
- Dropdown
- Checkboxes
- Radio button
- Image
- Attachment
- Message (Display Only)
Step 8: Implement field validation to ensure accuracy in data collection through registration forms. You can validate fields by:
- Decimals
- Integers
- Email address
- Web URL address
- Letters only
- Letters and/or numbers
- Date
Step 9: Mark the field mandatory and customers won't be able to register without answering the option. It is useful in collecting important information about customers.
Step 10: Create dependent fields.
Make one field dependent on another. For example, you can make a kid's field dependent on the marital status field. If the customer selects married, the kid's field will appear, otherwise, it won't.
Click Save and you have successfully created a field. Repeat this simple process to add more fields.
Note: If you want to customize your product page by adding custom fields only to your product's page, you can use the Prestashop custom product fields module. This module works specifically on your Product's detail page.
Levar
O formulário de registo da PrestaShop precisa de ser melhorado e de ter funcionalidades adicionais relevantes para uma empresa. Comparando os métodos acima referidos para expandir o formulário de registo, podemos dizer que a utilização de um módulo é o mais fácil. Oferece a adição de diferentes tipos de campos, para além de outras funcionalidades úteis.
Perguntas Frequentes (FAQs)
Quais são os benefícios de usar o módulo de Campos de Registro Personalizados no Prestashop?
O módulo de Formulário de Registro do Prestashop permite que você obtenha informações adicionais dos seus clientes. Dessa forma, você pode identificar seu comportamento e necessidades para oferecer soluções melhores e personalizadas.
O módulo de Formulário de Registro do Prestashop me ajudará a vender mais?
Sim, ao personalizar a loja online de acordo com as preferências específicas dos clientes e oferecer ofertas relevantes, você verá um aumento nas conversões.
Quais são os tipos de campos personalizados mais importantes?
Estes são alguns dos principais campos personalizados que você pode adicionar:
- Caixas de seleção
- Seletor de data
- Data de nascimento
- Categoria favorita
- Seletor de data e hora
- Rótulos
- Campo numérico
Products Related To This Post
-
 Prestashop Select Customer...
Prestashop Select Customer Group at Registration dá...
-
 Prestashop valide novos...
Prestashop Validar novos usuários no Módulo de...
-
 Módulo de Registro B2B...
Simplifique o processo de integração com o Módulo...
-
 Campos personalizados...
O módulo de registro PrestaShop transforma o...